Everyone can now send invitations! Please read the guidelines. And then send your invitations.
Opposed sub
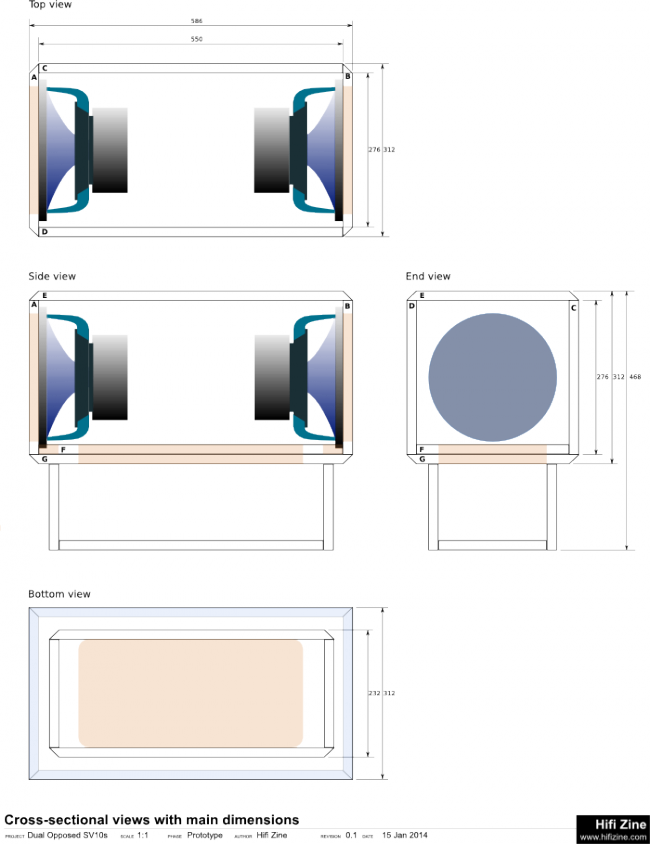
I decided to build my next sub this way. Since I changed my mind halfway through, some panels were already cut, which determined to some extent the dimensions. This one is for a 10" driver but it's a little tight. If I were doing it again, I'd make the top part a little larger to make it easier to get the drivers in there, and the bottom section shorter. In this one the driver mounts from the inside which also makes the fit tight.
I suppose I should add that the bottom section is removable, so the panels marked F and G in the diagram are not glued together, they are screwed together.
Well, that be the plan.


Comments
looking forward to see this finished .
Johm Roger & I used dowel as the bracing inside seems to work fine .
Cheers
G'day John
I really like your pictures/diagrams.
Whci drawing program do you use?
I'm curious to know how you are going to effectively join the box edges together given the deep bevel. I honestly can't picture how the joins will be strong enough over the long term without some internal corner bracing...
Mal, I might be able to use some in the middle. If I'm not careful though I won't be able to get the drivers in!
Graham, I use Inkscape - http://www.inkscape.org/en/ - there's a learning curve though, it's a general purposes drawing program so some of these are time-consuming.... I'm getting faster now because I just modify an existing one.
A nice thing is that because it's an SVG (Scalable Vector GRaphics) editor you can download SVG "parts" which can come in handy sometimes.
Still need to start learning Sketchup....
Hi Seano, I think it would be strong enough, unless the plies can separate? When it's glued together in 3D it's a lot stronger than it looks. Still, once I have it glued together I'll decide what bracing to add and maybe additional strips into the corners.
Drill a pilot hole right through .Then drill half way through flip board and drill through from the other side .
Don't use cheap bits ,and a press drill will help .
Cheers
This!
Good tip Mal, thanks! Don't have a drill press ( (yet) But better bits might help. Are these good?
http://www.carbatec.com.au/brad-point-drill-bit-set-cmt-8-piece_c8920?zenid=kl6s3nqge060bj3vdnrj857tg6
(Don't know what happened to the comment I posted last night... )
While I'm at it I should get some countersinks coz that was a bit messy las time around too...
http://www.carbatec.com.au/countersink-set-7-piece_c8890 ?
Anything with the CMT brand is not (IME) garbage.
Not so impressed by the countersink set. Given you are playing with plywood (lethal to shit tools), I'd go with either the Fuller set that Carbatec offers or get just the ones you really need from Carbi-i-tool (Oz made!) via http://www.apworkshop.com.au/html_carbitool/43N-dcb.html
Thanks Seano! I'm balking at the prices to be honest... I guess I can live with just one for the speaker projects, need to figure out which one. (1/4 inch bolt) [Edit: well I guess it would have to be the one with a 6.3 mm bit - duh]
Any thought on these? http://www.carbatec.com.au/colt-zero-mark-countersinks_c21270
Test-fit of driver:
It's fairly tight in there...
I deleted it by mistake :-S . I was having trouble with the quote button .
Go with Seano rec. The better the drill bit and counter sink tool the better job .I've used the cheap counter set combo's and I find they tear at the wood .
It is a tight fit but looking good John .
Cheers
Never baulk at good tools...they'll pay for themselves by causing you far less grief. You wouldn't skimp on speakers, would you? Same goes for tools.
I once spent $90 for a specialist drill bit to drill holes for Euroscrews into the back of a kitchen load of drawer fronts...just for one job. It has no other purpose. It saved us a world of hurt yet it now sits orphaned in my drill box...still it was worth it. Same goes for the marking jig that went with it.
As for the Colt countersinks...no experience but if price is any guide then they'll be way better than the cheapies.
Point taken... :-| I'll get one of the countersinks and added some more clamps as well, I'll have to call Carbatec tomorrow as the shopping cart estimates freight at 4000.41 kg...
I'm fiddling with a new bracing method I "invented." I call it... ze starfish!
The idea is that you put more material in the middle of the panel, where it would be more effective (than e.g. the corner). Ideally add a brace between starfish on opposite panels.
Modified version in this box:
I like Ze starfish
I reckon, (ie no evidence or knowledge I can draw on) that where the starfish crosses the panel would be reasonably braced, but by the end of the legs there is SFA bracing and you'd do better making porn movies. You have the house for it ......
Yah, yah!! )
)
Nigel, the idea is that usually the end of the taper is fairly close to the perpendicular panel. (Or a rigid brace). I couldn't do it in this box because then I wouldn't be able to get the drivers in. Maybe in the 12" version.
Variations on a theme... the idea, basically I suppose, is to make the panel stiffer in both dimensions. Unlike shelf braces, which only work in one dimension. Unless you do a "matrix" and then you need even more good material. Whereas starfish can be cut from leftovers.
Oh the joys of being insomniac...
Hey John , I'll have a talk with my off sider and see if I could implement Ze starfish into some cabs we are building :-b .
Throw the word chocolate in and it's a whole other world :-O
Cheers